Categories
Tags
-
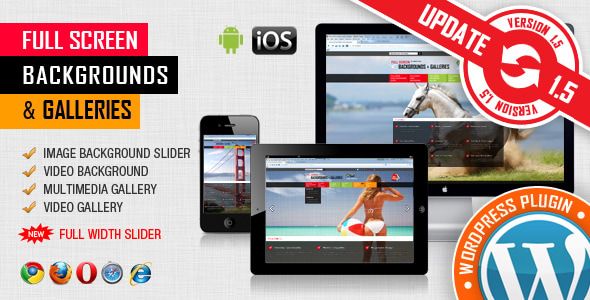
#Image & Video FullScreen Background WordPress Plugin: A Developer's Deep Dive & Technical Review Creating an immersive first impression on a website often comes down to visuals. While clean
#minimalist designs have their place
#sometimes you need to hit the user with a full-blast
#edge-to-edge visual statement. This is where full-screen backgrounds come into play. They can set a mood
#showcase a product
#or create a cinematic experience that static layouts simply can't match. The challenge
#however
#has always been implementation. Wrestling with CSS
#ensuring responsiveness
#and fighting theme conflicts can turn a simple design idea into a development nightmare. This is the problem the Image&Video FullScreen Background WordPress Plugin aims to solve. In this technical review and guide
#Building an e-commerce website for a highly specialized and regulated industry like firearms is not for the faint of heart. You're not just selling t-shirts; you're dealing with complex product specifications
#a discerning customer base that values precision
#and the constant need to project an image of professionalism and trust. Into this challenging space steps the Range - Weapon Shop & Gun Store WordPress Theme
#a product that aims to be a turnkey solution for online gun stores
#shooting ranges
#and tactical gear suppliers. But in a world of multipurpose themes
#does a niche-specific tool like this actually hit the target
#or does it misfire under the pressure of real-world development? As a developer who has navigated the murky waters of niche e-commerce
#I'm putting Range through its paces to see if it’s a precision instrument or just a generic template in tactical camouflage. First Impressions: Aesthetics and Demo Analysis Loading up the demo for the first time
#Range immediately establishes its intended atmosphere. The design language is unapologetically masculine and rugged
Archives
Image & Video FullScreen Background WordPress Plugin: A Develop
-
Posted by jingyang liu Filed in Technology #Image & Video FullScreen Background WordPress Plugin: A Developer's Deep Dive & Technical Review Creating an immersive first impression on a website often comes down to visuals. While clean #minimalist designs have their place #sometimes you need to hit the user with a full-blast #edge-to-edge visual statement. This is where full-screen backgrounds come into play. They can set a mood #showcase a product #or create a cinematic experience that static layouts simply can't match. The challenge #however #has always been implementation. Wrestling with CSS #ensuring responsiveness #and fighting theme conflicts can turn a simple design idea into a development nightmare. This is the problem the Image&Video FullScreen Background WordPress Plugin aims to solve. In this technical review and guide 107 views
Image & Video FullScreen Background WordPress Plugin: A Developer's Deep Dive & Technical Review
Creating an immersive first impression on a website often comes down to visuals. While clean, minimalist designs have their place, sometimes you need to hit the user with a full-blast, edge-to-edge visual statement. This is where full-screen backgrounds come into play. They can set a mood, showcase a product, or create a cinematic experience that static layouts simply can't match. The challenge, however, has always been implementation. Wrestling with CSS, ensuring responsiveness, and fighting theme conflicts can turn a simple design idea into a development nightmare. This is the problem the Image&Video FullScreen Background WordPress Plugin aims to solve. In this technical review and guide, we're going to tear it down, see how it works, and determine if it's a professional-grade tool or just another plugin clogging up the repository.
We'll be looking at its features, performance implications, and practical setup. For developers and agencies, the ability to quickly and reliably implement such a core design feature is invaluable. We'll explore if this plugin delivers on that promise, especially when sourced under a GPL license from providers like gpldock, which offers a cost-effective way to access premium tools.
What It Claims vs. What It Does: A Core Functionality Breakdown
On the surface, the plugin's purpose is simple: apply a full-screen image or video background to your WordPress site. But the devil is always in the details. A professional tool needs to offer granular control. Let's look at the key features and assess their real-world utility.
The Control Panel: Global vs. Local Override
After installation and activation, the plugin adds a new menu item to your WordPress dashboard, typically labeled "Fullscreen BG". This is your global control center. Here, you can set a default background that will apply across your entire website. This is the first sign of a well-thought-out architecture. You can set it and forget it for a simple site, or use it as a fallback.
The real power, however, comes from the per-page and per-post override. When you edit any page, post, or even a custom post type, you’ll find a new meta box below the content editor. This box contains nearly all the same options as the global settings page. This hierarchical control is critical. It allows you to maintain a consistent brand background on most pages but create unique, high-impact landing pages with entirely different video or image backgrounds. For example:
- Homepage: A dynamic, self-hosted video showcasing your company culture.
- About Us Page: A static, high-resolution image of your team.
- Services Pages: A subtle, repeating pattern overlay to maintain focus on the text.
- Blog Posts: No background, inheriting the theme's default for maximum readability.
This level of contextual control is what separates a professional tool from a simple script. It understands that a website is not a monolithic entity and gives the developer the levers to make precise adjustments where needed.
Supported Background Types
The plugin supports a solid range of background types, covering most professional use cases:
- Image Backgrounds: This is the most basic function. You can upload an image through the standard WordPress media library. The key here isn't just uploading the image, but controlling its behavior. The plugin provides controls for
background-size(e.g., 'cover', 'contain'),background-position(e.g., 'center center', 'top left'), andbackground-attachment. Setting attachment to 'fixed' creates that classic parallax scrolling effect, where the content moves over a stationary background. - Self-Hosted Video: For maximum control and performance, self-hosting is often the best route. The plugin requires you to provide video files in multiple formats, primarily MP4 and WebM. This is not a plugin limitation; it's a web standard for ensuring cross-browser compatibility. Firefox prefers WebM, while Safari and Chrome are happy with MP4. You also get an essential "poster" image field. This image is displayed while the video is loading or on devices that don't support autoplaying video (like many mobile browsers on low-power mode). This is a non-negotiable feature for a good user experience.
- YouTube & Vimeo Videos: This is a massive convenience feature. Instead of hosting the video yourself, you can simply paste the ID of a YouTube or Vimeo video. The plugin handles the API integration to pull and display the video as a background. There are trade-offs, of course. You're subject to the terms of service of these platforms, and you have less control over compression and preloading. It also introduces an external dependency, which can affect site performance. However, for quick deployments or for clients who manage their videos on YouTube, it's an indispensable option. You can typically mute the audio and disable controls to make it a true background element.
- Pattern Overlays: This is a surprisingly powerful feature. A busy image or video can destroy text readability. The plugin allows you to upload a semi-transparent pattern (often a simple dot or line pattern in a .png file) that sits on top of the main background but behind your content. This subtle texture can drastically improve the legibility of foreground text without completely obscuring the background visual. You can also just use a solid color overlay and adjust its opacity.
Installation and Configuration: A Practical Walkthrough
Let's get our hands dirty. We'll walk through the process of installing the plugin and setting up a few common scenarios. This assumes you've already acquired the plugin's .zip file.
Step 1: Installation
This is standard WordPress procedure. No surprises here.
- Log in to your WordPress dashboard.
- Navigate to Plugins → Add New.
- Click the Upload Plugin button at the top of the page.
- Choose the .zip file you downloaded.
- Click Install Now and then Activate Plugin.
Once activated, you should see the new "Fullscreen BG" menu item in your dashboard. Let's dive in.
Step 2: Setting a Global Image Background
This is the simplest configuration. It's great for establishing a baseline look for the site.
- Go to Fullscreen BG from your dashboard menu.
- Ensure the first option, "Plugin Status," is enabled.
- Select "Image" as the background type.
- Click the "Add Image" button. This will open the WordPress Media Library. Upload a new, high-resolution image (ideally optimized for the web, <500KB) or select an existing one.
- The plugin will show a preview of the image. Below this, you'll find the CSS controls. For most cases, you'll want the
background-sizeset tocover. This ensures the image always fills the entire screen, cropping as necessary without distorting the aspect ratio. - Set
background-positiontocenter centerto keep the focal point of the image in the middle of the screen. - Leave
background-repeatasno-repeat. - Save your changes. Visit the front end of your site. Your image should now be displayed as a full-screen background on all pages.
Step 3: Configuring a Self-Hosted Video Background on a Specific Page
This is a more advanced scenario that showcases the plugin's per-page override functionality. Let's say we want a video background on our homepage only.
- First, prepare your video assets. You need a short, looping video. Export it as an MP4. Then, use a tool like HandBrake or an online converter to create a WebM version. You also need a high-quality poster image (JPG or PNG) of the same aspect ratio.
- Upload all three files (video.mp4, video.webm, poster.jpg) to your WordPress Media Library and copy their URLs.
- Navigate to Pages → All Pages and open your homepage for editing.
- Scroll down to the "Fullscreen Background" meta box.
- The first option here is crucial: "Settings for this page". Change it from "Use Global Settings" to "Use Custom Settings". This will reveal all the background options for this page only.
- Select "Self-Hosted Video" as the background type.
- You will see fields for "MP4 Video URL," "WebM Video URL," and "Poster Image URL." Paste the URLs you copied in step 2 into their respective fields.
- You'll likely see options for "Muted," "Loop," and "Autoplay." For a background video, you should enable all three. Backgrounds with sound are almost universally a bad user experience.
- Update the page and view it. Your homepage should now feature the looping video background, while all other pages still use the global image background we set earlier.
The Developer's Critique: Performance, Compatibility, and Annoyances
A plugin can have all the features in the world, but if it's slow, buggy, or conflicts with other tools, it's useless in a professional environment. This is where we need to be critical.
Performance Implications
Let's be blunt: adding a full-screen, high-resolution image or video to your site will impact performance. There's no magic bullet. The plugin's job is to implement this feature as efficiently as possible. From what I can see, the plugin is fairly lightweight in itself. It's not loading dozens of unnecessary JavaScript libraries. It primarily injects the necessary CSS and a small JS script to handle video logic.
The real performance bottleneck is not the plugin; it's you. The responsibility for optimizing assets falls on the developer.
- Images: Before you upload that 5MB photo from your camera, run it through an optimization tool like ImageOptim or an online service like TinyPNG. Resize it to a reasonable dimension (e.g., 1920px wide is often sufficient). Convert it to a next-gen format like WebP if your audience's browsers support it.
- Videos: This is even more critical. A 10-second, 1080p video can easily be 20-50MB. This is unacceptable for a web background. You must compress it heavily. Aim for a file size under 5MB if possible. A shorter loop (5-7 seconds) is better than a longer one. Remember, it's an ambient background, not a feature film. The poster image is your best friend here, as it provides an instant visual while the (hopefully small) video file loads in the background.
One feature I would look for in a top-tier plugin is the ability to specify a different, smaller background image for mobile devices. Mobile connections are less reliable, and a large background video can kill a user's data plan and patience. Some versions of this plugin include this feature. If yours does, use it. If not, you might need to write a custom media query to override the background on smaller screens.
/* Example of a manual mobile override in your theme's custom CSS */
@media (max-width: 768px) {
  body {
    background-image: url('path/to/your/mobile-optimized-image.jpg') !important;
    background-video: none !important; /* This may or may not work depending on the plugin's implementation */
  }
}
Theme and Page Builder Compatibility
This is the million-dollar question. How does it play with others? The plugin works by applying the background to the
<body>tag or a specific container div. In theory, this should work with any well-coded theme.However, many modern themes and page builders (Elementor, Divi, Beaver Builder, WPBakery) have their own complex systems for handling page and section backgrounds. This is where conflicts can arise. For example, if your theme's main content wrapper has a solid white background color (e.g.,
#ffffff), it will sit on top of the plugin's body background, and you won't see it. You would need to go into your theme's options or custom CSS to set that wrapper's background totransparent..site-content { background-color: transparent; }This is a common "gotcha." The plugin is doing its job, but the theme's own styling is covering it up. A good developer will know how to use the browser's inspector tool to identify the culprit element and write the necessary CSS override. A beginner might just assume the plugin is broken.
Generally, plugins that target the
<body>tag are fairly robust. Where you might find more friction is if a page builder is also trying to control the body background or if you're trying to apply a background to a specific section that the builder already manages. In these cases, it's often better to use the page builder's native background features for that section and use this plugin only for global or full-page overrides where the builder doesn't have control.Final Verdict: Is It a Professional Tool?
So, what's the bottom line? The Image & Video FullScreen Background WordPress Plugin is a capable and focused tool. It does exactly what it says on the tin, and it does so with a surprising degree of professional-level control. The distinction between global settings and per-page overrides is its most powerful feature, allowing for flexible and creative designs across a site.
Pros:
- Strong hierarchical control (global vs. local settings).
- Good support for various media types (Image, Self-Hosted Video, YouTube/Vimeo).
- Essential features like poster images and pattern overlays are included.
- The user interface is straightforward and integrated directly into the WordPress admin.
Cons:
- Performance is entirely dependent on user-provided assets. It provides no built-in optimization.
- Can require some CSS knowledge to resolve conflicts with themes or page builders that apply their own background styles.
- Lacks some advanced features like specifying different videos/images for mobile vs. desktop out of the box (depending on the version).
This is not a plugin for the complete novice who expects a one-click magic solution without any thought to asset optimization or potential theme conflicts. However, for a web developer, an agency, or a technically-inclined site owner, it's an excellent utility. It saves you the time of hand-coding a solution and provides a clean, reusable interface for managing a powerful design element. When you can acquire premium tools like this via a GPL club, it becomes an even more valuable addition to your toolkit, offering a massive return on a minimal investment. It's a solid piece of kit for anyone looking to create visually impactful websites without reinventing the wheel every time.
For those building a toolkit of reliable plugins and themes, exploring marketplaces that offer items like Free download WordPress themes and plugins under the GPL is a smart economic move, allowing you to test and deploy a wide range of solutions affordably.