Categories
Tags
-
#Image & Video FullScreen Background WordPress Plugin: A Developer's Deep Dive & Technical Review Creating an immersive first impression on a website often comes down to visuals. While clean
#minimalist designs have their place
#sometimes you need to hit the user with a full-blast
#edge-to-edge visual statement. This is where full-screen backgrounds come into play. They can set a mood
#showcase a product
#or create a cinematic experience that static layouts simply can't match. The challenge
#however
#has always been implementation. Wrestling with CSS
#ensuring responsiveness
#and fighting theme conflicts can turn a simple design idea into a development nightmare. This is the problem the Image&Video FullScreen Background WordPress Plugin aims to solve. In this technical review and guide
Archives
Electriza Elementor Kit: A Developer's Hands-On Review and Tech
-
Electriza Elementor Kit: A Developer's Hands-On Review and Technical Guide
In the world of service-based businesses, a functional, trustworthy website isn't a luxury; it's a fundamental tool for generating leads. For electricians, plumbers, and maintenance professionals, the digital storefront needs to convey reliability and expertise. This is the promise of the Electriza - Electrical Installation & Maintenance Services Elementor Template Kit. It’s marketed as a turnkey solution for a niche that often struggles with online presentation. But as any seasoned developer knows, "turnkey" is a term to be met with healthy skepticism. We’re going to pull this kit apart, not just as a collection of pixels, but as a foundational framework for a real-world business. We'll dive into its structure, walk through a granular installation process, and determine if it’s a genuine time-saver or just a pretty, but ultimately flimsy, facade.
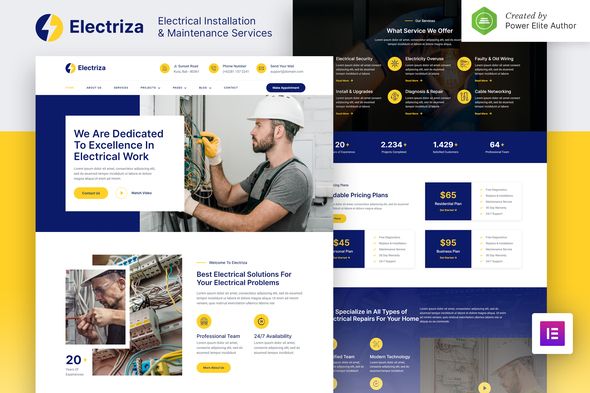
First Look: Deconstructing the Design Language
Before any import process begins, the first step is always a critical review of the live demo. Does it hit the mark for its intended audience? Electriza’s aesthetic is clean, modern, and leans heavily on a blue, white, and yellow color palette. This is a safe and effective choice. Blue conveys professionalism and trust, while the yellow accent color—reminiscent of safety warnings and high-voltage signs—is a clever, industry-appropriate touch. It avoids the tired, generic corporate look while still feeling professional.
The typography is solid. A bold, geometric sans-serif for headings (likely Montserrat or a similar Google Font) provides a sense of stability and modernity. The body copy is a clean, readable sans-serif that prioritizes legibility over flourish. This is a wise decision; a potential client trying to find an emergency contact number doesn't care about fancy ligatures. They care about clarity.
Homepage and Core Pages Analysis
The homepage layout follows a well-established conversion-focused formula. Let's break it down:
- Hero Section: It's full-width with a prominent headline, subheading, and a clear Call-to-Action (CTA) button. The demo uses a background image of an electrician at work. While effective, this is the first area a user must customize. The reliance on generic stock photography is a weakness of many template kits, and Electriza is no exception. A real business will need to replace this immediately with authentic photos to build genuine trust.
- Services Overview: A three or four-column icon-and-text block section provides a quick summary of core services. This is standard practice and well-executed here. The icons are simple and universally understood.
- About Us Snippet: A section with an image and a block of text designed to introduce the company and build rapport. It's functional but requires significant content work to be compelling.
- Why Choose Us: This section often uses counters or feature lists to highlight key differentiators like "Licensed Professionals" or "24/7 Emergency Service." Electriza implements this effectively, providing a template for building credibility.
- Projects/Portfolio: The demo showcases a grid of recent work. This is arguably the most crucial section for a trade business. The template provides the layout, but the success hinges entirely on the quality of the photography the business can provide.
- Testimonials: A slider or static block for client quotes. Essential for social proof.
- Contact CTA: A final, bold section before the footer, driving users to get in touch.
The internal pages (About, Services, Project Detail, Contact) expand on these themes. The Service Detail page template is particularly important. It provides a solid layout with a sidebar for a service list and contact details, and a main content area for describing the service in detail. This is a good structure for both user experience and SEO, as it allows for the creation of dedicated, keyword-rich pages for each service offering.
My initial critique is that while the design is clean, it's also somewhat "safe." It doesn't take many risks. This isn't necessarily a negative for its target audience—an electrician's website should prioritize clarity and trustworthiness over avant-garde design. However, a developer will need to put in the work on content, imagery, and perhaps subtle micro-interactions to make a site built from this kit truly stand out from competitors who might be using a similar template.
The Technical Blueprint: What’s Under the Hood?
A template kit is more than its visual design; it’s a collection of JSON files that configure an Elementor installation. The quality of a kit is determined by its organization, dependencies, and how well it leverages Elementor's core features.
Dependencies and Requirements
The primary dependencies for Electriza are:
- Elementor (Free): The core page builder plugin.
- Elementor Pro (Paid): This is a critical point. The kit relies on Elementor Pro for essential features like the Theme Builder (for headers, footers, and post templates), the Form widget, and potentially for global styles and custom fonts. Running this kit without Elementor Pro is not feasible; you would lose the header, footer, and all template-based pages, rendering the kit useless. This is a non-negotiable requirement.
- Additional Plugins: The kit may also bundle or require other small plugins, often for specific widgets or effects (e.g., a particular slider or icon set). When importing, Elementor will prompt you to install these if they are not already present. It's crucial to pay attention to this step.
Template Structure and Organization
Upon unzipping the main download file, you'll typically find a primary JSON file for the kit import, and sometimes separate JSON files for individual pages or sections. You might also find a documentation file.
A well-made kit like Electriza should make extensive use of Elementor's Site Settings. I would expect to see:
- Global Colors: The theme's core colors (the blue, yellow, black, white, and grays) should be defined as Global Colors. This is the single most important feature for efficient rebranding. A developer should be able to go into `Site Settings > Global Colors`, change the primary and accent colors once, and see those changes propagate across the entire site. If colors are hard-coded into individual widgets, the kit is poorly constructed and will be a nightmare to customize.
- Global Fonts: Similarly, the heading styles (H1, H2, etc.) and body text styles should be defined in `Site Settings > Global Fonts`. This allows for site-wide typography changes in seconds.
The kit should also include a comprehensive set of templates within the Theme Builder:
- Header: The site-wide header, including the logo and navigation menu.
- Footer: The site-wide footer, with contact info, quick links, and copyright text.
- Single Post: The template for individual blog posts.
- Single Page: The default template for standard pages.
- Archive/Blog: The template for the main blog page, showing a list of posts.
- 404 Page: A custom "Not Found" page to provide a better user experience for broken links.
The presence and proper configuration of these elements separate a professional kit from an amateur one. It’s the difference between a real starting framework and a simple collection of page layouts.
Installation Guide: From Zero to a Functional Site
This is where theory meets practice. Following these steps meticulously will save you hours of frustration. Do not just import the kit and expect it to work perfectly; the process requires careful attention before, during, and after the import.
Step 0: Prerequisites and Environment Setup
- Clean WordPress Install: Start with a fresh, clean installation of WordPress. Do not attempt to import this kit into an existing site with content and other themes. You will create a mess of conflicting styles and settings. Use a staging site or a local development environment.
- Install Plugins: Before you do anything else, install and activate the necessary plugins: `Elementor` and `Elementor Pro`. Do not proceed without Elementor Pro being active.
- Check Server Settings: In your WordPress dashboard, go to `Tools > Site Health`. Look for any critical issues. Specifically, check your server's `PHP memory_limit` and `max_upload_size`. Importing a full kit can sometimes fail if these values are too low. A `memory_limit` of 256M or 512M and a `max_upload_size` of 64M are good starting points.
Step 1: Acquire and Unpack the Kit
Download the Electriza template kit zip file from your source, for instance, a GPL provider like gplpal. Unzip this main file on your local computer. Inside, you should find the core kit file (which is often another .zip file or a .json file), and possibly folders for documentation or individual templates. Do not upload the entire main package to WordPress. You are looking for the specific Elementor Kit file.
Step 2: The Import Process
- Navigate to `Elementor > Tools` in your WordPress dashboard.
- Click on the `Import / Export Kit` tab.
- Under the "Import a Template Kit" section, click the "Start Import" button.
- Select the Elementor Kit .zip file you identified in the previous step. WordPress will upload and read the file.
- The Plugin & Template Chooser Screen: This is a critical step. Elementor will show you which plugins the kit requires and which templates it will import (content, site settings, etc.). It will give you the option to install any missing plugins. Make sure all required plugins are selected. You will also be given checkboxes to select what components of the kit you want to import. For a first-time setup on a clean install, select all of them.
- Elementor will now run the import process. It can take a few minutes. It will first install plugins, then import templates, and finally, import site settings. Do not close the browser tab during this process.
Step 3: The Crucial Post-Import Checklist
The import process is rarely a perfect, one-click solution. Here’s what you must check and fix immediately after the "Success!" message appears.
- Check Header & Footer: Go to `Templates > Theme Builder`. You should see the imported Header and Footer. Click on "Edit Conditions" for each one. Often, the display conditions are not set correctly on import. For the Header, you must set the condition to "Include: Entire Site." Do the same for the Footer. Save and close. If you skip this, your site will appear with the default theme's header and footer, not Electriza's.
- Set the Homepage: Go to `Settings > Reading`. Under "Your homepage displays," select "A static page." From the "Homepage" dropdown, choose the imported Home page (it should be clearly named, e.g., "Home"). Save your changes.
- Re-save Permalinks: Go to `Settings > Permalinks`. Select the "Post name" structure and click "Save Changes." This can help prevent 404 errors on the newly imported pages.
- Check Navigation Menus: Go to `Appearance > Menus`. The importer may have created a menu, but it's often not assigned to the correct location. Find the main menu structure, and in the "Menu Settings" at the bottom, assign it to the "Header" or "Primary" menu location defined by your Elementor header. You might need to create the menu from scratch by adding the imported pages to it.
- Configure Forms: The contact form and any quote request forms will not work out of the box. Edit the page containing the form with Elementor. Click on the form widget. Under the "Actions After Submit" tab, ensure "Email" is selected. Then, go to the "Email" tab that appears and set the "To" field to your client's or your own email address. Customize the "From Email" and "From Name" as well. Do this for every form on the site.
- Review Global Settings: Go to `Elementor > Site Settings`. Quickly review the Global Colors and Global Fonts to ensure they have been imported correctly. This is your command center for customization.
Completing this checklist moves you from a broken import to a functional, albeit content-less, website. This is the baseline from which all customization begins.
Customization and Real-World Implementation
With the kit installed and the basic structure in place, the real work starts. How adaptable is Electriza to a real company's brand and content?
Branding and Re-skinning
This is where Electriza's adherence to Elementor's best practices pays off. Assuming the kit uses Global Colors, the rebranding process is refreshingly efficient.
- Go to `Elementor > Site Settings > Global Colors`.
- You will see the defined colors: Primary (Blue), Accent (Yellow), Text, etc.
- Click on the Primary color and replace it with your client's main brand color.
- Click on the Accent color and replace it with their secondary color.
If the kit was built correctly, this ten-second change should update about 80% of the site's color scheme. You'll see buttons, backgrounds, and heading colors change instantly across all pages. You may still need to tweak a few individual widgets that have custom color settings, but the bulk of the work is done. The same process applies to `Global Fonts` for changing the site-wide typography.
Content Population and Scalability
Here, we need to look at how the dynamic sections are built. Take the "Our Projects" portfolio section. Is it just a static collection of image boxes on the homepage? Or does it use the `Posts` or `Portfolio` widget to dynamically pull in content from a Custom Post Type? A professional kit should use a dynamic method. This allows the client to easily add new projects through the WordPress dashboard without ever having to open the Elementor editor. If the kit uses static sections, it means a developer has to manually edit the page to add every new project, which is inefficient and not scalable for the client.
A quick inspection of Electriza's structure reveals it leans towards a more static approach for simplicity. This is a double-edged sword. It's easier for a beginner to understand—you just replace the images and text directly on the page. However, for a business that completes projects frequently, a developer should consider rebuilding the portfolio section to use a Custom Post Type (created with a plugin like CPT UI) and have the Elementor page dynamically display those posts. This creates a much more robust and client-friendly long-term solution.
Performance Considerations
Elementor kits, especially those with large hero images and multiple sections, can be heavy. Out of the box, Electriza is no featherweight. The demo scores will likely be average at best due to large, unoptimized images and the sheer number of DOM elements Elementor can generate.
To make a site built on this kit perform well, a developer must be disciplined:
- Image Optimization: Before uploading any of your own photos, compress them aggressively using a tool like TinyPNG or an image optimization plugin like Smush or ShortPixel. Resize images to the exact dimensions they will be displayed at. Don't upload a 4000px wide photo for a 500px wide container.
- Elementor Experiments: In `Elementor > Settings > Experiments`, enable performance-enhancing features like "Optimized DOM Output" and "Improved Asset Loading." This can significantly reduce code bloat.
- Caching: A high-quality caching plugin (e.g., WP Rocket, FlyingPress) is not optional. It is mandatory for any production Elementor site. It will minify CSS/JS and serve static HTML files to visitors, dramatically improving load times.
The performance of the final site is less a reflection of the kit itself and more a reflection of the developer's optimization practices. The kit provides the structure; you provide the performance tuning.
The GPL Value Proposition and Final Verdict
Acquiring the Electriza kit from a marketplace like ThemeForest involves a standard license fee and direct support from the original author. Getting it from a GPL club like gplpal operates on a different model. Under the GNU General Public License (GPL), the software is free to use, modify, and redistribute. A GPL club charges for membership, which gives you access to a vast library of these themes and plugins, but not for the items themselves. The trade-off is clear: you get access to premium tools for a fraction of the cost, but you forfeit the direct, one-on-one support from the original developer.
This model is perfectly suited for developers, agencies, and technically-proficient business owners who are comfortable with troubleshooting. If you followed the post-import checklist above, you've already performed the kind of support tasks you'd be on your own for. If that process seems daunting, a GPL club might not be the right fit for you.
Verdict: Is Electriza a Solid Foundation?
Electriza is a well-designed, professional, and largely well-structured Elementor template kit. Its visual language is perfectly matched to its target niche, and its use of Elementor's core Site Settings features makes rebranding and customization relatively straightforward for someone with Elementor experience.
Who is this kit for?
- Freelance web developers and small agencies building sites for clients in the electrical and maintenance trades. It's a massive head start that can cut development time significantly.
- DIY business owners who are already comfortable with WordPress and Elementor and are prepared to handle the technical post-import cleanup.
Who should avoid it?
- Absolute WordPress beginners. The post-import configuration, while not complex for an experienced user, can be a major roadblock for a novice. The lack of direct developer support in a GPL context would be a deal-breaker.
- Anyone looking for a true "one-click" solution that requires zero technical intervention. That product does not exist, but this kit is not the closest you can get.
Ultimately, Electriza is a strong starting point. It provides a solid B+ foundation. It's up to the developer or end-user to supply the high-quality content, authentic imagery, and performance optimizations needed to elevate the final product to an A+. It successfully shaves off the initial 10-20 hours of design and layout work, and for a professional, that's a valuable proposition. If this particular style doesn't fit your project, there are countless other options available to explore, making it easy to Free download WordPress themes and kits to find the perfect match for your next build.