Deconstructing the Student Study Notepad: A Developer's Review
-
Deconstructing the Student Study Notepad: A Developer's Review and Reskin Guide
The App Store is a brutal arena. For every breakout success, thousands of well-intentioned apps languish in obscurity, often because the development runway was too long or the initial investment too high. This reality has fueled a market for pre-built source code and app templates, promising a shortcut to a minimum viable product (MVP). Today, we're tearing down one such offering: the Student Study Notepad - iOS App - Subject Notes - Topic Notes - Digital Study Notepad. It presents itself as a turnkey solution for developers looking to tap into the evergreen education and productivity market. My goal here isn't to just review it as a consumer product, but to dissect it from the perspective of a senior developer: examining the code quality, architectural choices, and the practical realities of taking this template from a download to a unique, App Store-ready product.
The Premise: More Than an App, It's a Foundation
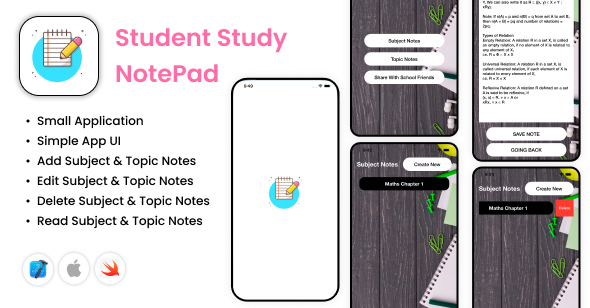
Before diving into Xcode, it’s critical to understand what you're buying. This isn't a finished, polished app like Notion or Evernote. It's a blueprint. You're acquiring the foundational code for a hierarchical note-taking application specifically structured for students. The core logic is built around a simple, effective hierarchy: Subjects -> Topics -> Notes. A student can create a "Biology 101" subject, add topics like "Cell Mitosis" and "Genetics," and then populate each with specific notes. This is the core feature loop.
The value proposition for a developer is straightforward: time. Building this structure from scratch—including the UI navigation, data persistence, and user input handling—is a task that can easily consume weeks, if not months, of development time. You'd be building view controllers, setting up Core Data or another persistence layer, wrestling with table views, and handling the navigation stack. This template purports to have done that heavy lifting, allowing you to focus on differentiation: unique features, a custom UI/UX (the "reskinning" process), and your go-to-market strategy. It's about buying a head start in a race where speed is a significant advantage.
Digital marketplaces are filled with such accelerators. While a platform like gplpal might be known more for web assets, and you can certainly find a ton of Free download WordPress themes, the principle is the same for mobile app templates. They are functional starting blocks sold to a professional audience that values time over building everything from the ground up.
First Impressions & Project Autopsy
Upon downloading and unzipping the source code package, the first thing I look for is the project file. In this case, we have a standard
.xcodeprojfile, not an.xcworkspace. This is an immediate and important clue: the project likely has no external dependencies managed through a system like CocoaPods or Swift Package Manager. For many developers, this is a positive sign. It means the project is self-contained, reducing the potential for dependency hell, version conflicts, or the need to runpod installbefore you can even build. The flip side is that any functionality, like a special UI component or a database library, would have to be implemented with native frameworks or by manually dragging source files into the project.Opening the project in the latest version of Xcode reveals a clean, if somewhat basic, project structure. The code is written entirely in Swift and primarily uses the UIKit framework with Storyboards for the user interface. There's no SwiftUI in sight, which makes this template accessible to a wider range of iOS developers, including those who haven't yet made the jump to Apple's newer declarative UI framework. However, it also means the UI layer is less modern and potentially more cumbersome to modify for those accustomed to SwiftUI's reactive nature.
The file organization follows a logical, group-based structure. We have distinct groups for:
- View Controllers: The brains of each screen (e.g.,
SubjectsViewController,TopicsViewController,NoteDetailViewController). - Model: The data structures for Subject, Topic, and Note.
- Views: Custom UI elements, primarily custom
UITableViewCellsubclasses. - Helpers/Extensions: Utility functions and extensions on standard types to reduce code duplication.
- Assets: The
Assets.xcassetsfile containing colors, images, and the app icon.
This is a classic Model-View-Controller (MVC) arrangement, the bread and butter of traditional iOS development. It's not fancy, but it's universally understood and easy to navigate for any developer with a bit of iOS experience. A quick build-and-run on the simulator works flawlessly out of the box, which is always a good sign. The app is functional, responsive, and the core loop of creating subjects, topics, and notes works as advertised.
Architectural Deep Dive: Under the Hood
A functioning app is one thing; a well-architected one is another. Let's peel back the layers and inspect the key technical decisions made by the original author.
The UI Layer: All Aboard the Storyboard
The entire user interface is constructed using a single
Main.storyboardfile. This is a double-edged sword. For visual-oriented developers or those new to iOS, a storyboard provides a clear, graphical representation of the app's flow. You can see how view controllers connect via segues and get a decent "what you see is what you get" preview of the layout. The connections (IBActions and IBOutlets) are straightforward to trace.However, for professional teams or complex projects, single, monolithic storyboards are often an anti-pattern. They can become slow to load, are notoriously difficult to work with in a team environment (causing frequent source control merge conflicts), and can hide complexity. In this template's case, the app is simple enough that the single storyboard is manageable. The layouts use Auto Layout constraints, which appear to be correctly configured for different screen sizes, from a small iPhone SE to a large Pro Max model. Customization will involve directly manipulating these constraints and UI elements within the Interface Builder, a process that can be tedious but is visually intuitive.
Data Model and Persistence: The Core Data Choice
The most critical architectural decision in an app like this is how it stores data. The Student Study Notepad uses Core Data, Apple's native object graph and persistence framework. This is a solid, professional choice. Instead of simpler but less scalable options like
UserDefaultsor writing to a raw Plist file, Core Data provides a robust solution for managing the object lifecycle, handling relationships, and ensuring data integrity.The data model is defined in the
.xcdatamodeldfile and is exactly what you'd expect:- Subject Entity: Contains an attribute for its name (e.g., "History 204"). It has a to-many relationship with the Topic entity.
- Topic Entity: Contains an attribute for its name (e.g., "The Cold War"). It has a to-one relationship back to its parent Subject and a to-many relationship with the Note entity.
- Note Entity: Contains attributes for its content (a string) and creation date. It has a to-one relationship back to its parent Topic.
This relational structure is sound. The implementation uses a standard Core Data stack setup in the
AppDelegate.swiftfile, providing a managed object context to the rest of the application. All create, read, update, and delete (CRUD) operations are handled through this context. For a developer extending the app, this means adding a new attribute (like a note's priority level) would involve modifying the data model visually, regenerating theNSManagedObjectsubclasses, and then updating the relevant view controllers. It's a well-trodden path for iOS developers, and the template's implementation is clean and by the book.Code Quality and Conventions
The Swift code is generally clean and readable. It follows standard Swift API design guidelines, with clear naming for variables and functions (e.g.,
saveNote(),fetchSubjects()). There is a decent use of extensions to keep the code organized. For example, theTopicsViewControllermight have an extension dedicated to conforming to theUITableViewDataSourceprotocol, separating that logic from the main class definition.However, there are areas for improvement. The code lacks any unit or UI tests, which is common for templates but a critical omission for a production-ready application. A developer would need to build a testing suite from scratch. Error handling is also basic; you'll see a lot of
try?or simple print statements incatchblocks. In a real-world app, you would want more robust error handling to inform the user or log issues to a remote service. The view controllers also adhere strictly to MVC, which means they can get a bit bloated with logic that could be abstracted out in a more modern architecture like MVVM (Model-View-ViewModel) or VIPER. But again, for a template designed for simplicity and broad appeal, MVC is a pragmatic choice.Step-by-Step Installation & Configuration Guide
Taking this source code and making it buildable under your own developer identity is the first practical hurdle. Here’s a direct, no-fluff guide.
- Prerequisites: You need a Mac running a recent version of macOS. You will need Xcode installed (download it from the Mac App Store). To test on a physical device or submit to the App Store, you absolutely must have an Apple Developer Program membership.
- Download and Unzip: After purchasing, you'll receive a ZIP file. Unzip it to a convenient location on your machine. You will find the project folder containing the
Student Study Notepad.xcodeprojfile. - Project Configuration - The Critical Step: Open the
.xcodeprojfile in Xcode. The first and most important task is to re-brand the app to make it unique.- Select the project file in the Project Navigator (the top-level blue icon).
- Go to the "Signing & Capabilities" tab.
- Select your developer account from the "Team" dropdown. If you haven't added it yet, Xcode will prompt you to.
- Change the Bundle Identifier. This is a unique, reverse-DNS style string (e.g.,
com.yourcompany.newnotetaker). This cannot be the same as the original template's identifier. The App Store requires this to be globally unique. - Go to the "General" tab. Change the Display Name. This is the name that will appear under the app icon on the user's home screen.
- Build and Run on Simulator: Select an iPhone simulator from the device dropdown at the top of the Xcode window (e.g., "iPhone 14 Pro"). Press the "Run" button (the play icon) or use the shortcut
Cmd+R. The app should compile and launch in the simulator, allowing you to test the full functionality. - Running on a Physical Device: Connect your iPhone to your Mac. Select it from the device list. Xcode will automatically handle the provisioning process, creating the necessary certificates and profiles to sign the app with your developer identity and install it on your device. If you encounter any signing errors, the "Signing & Capabilities" tab is the place to fix them.
The Reskinning Process: Making It Your Own
A template is useless if you can't make it look unique. This template is straightforward to customize, provided you know where to look.
- Colors and Fonts: The best practice for managing app-wide colors is through the
Assets.xcassetscatalog. This template does this correctly. Open the asset catalog and you will find a "Colors" section with named colors like "AccentColor" or "BackgroundColor". To change the entire app's theme, you simply modify these color sets in the asset editor. The changes will propagate throughout the app wherever these named colors are used in the Storyboard. Fonts can be changed directly in the Storyboard by selecting labels and text views, but for a more robust solution, you would create a helper or extension to manage fonts programmatically. - App Icon: Also in
Assets.xcassetsis theAppIconset. To replace the icon, you just need to drag and drop your own set of pre-sized PNGs onto the appropriate wells in the editor. There are many free online tools that can generate all the required sizes from a single 1024x1024 image. - UI Wording and Layout: All static text (like button titles or screen headers) is set in the Storyboard. You can click on any element and change its text in the Attributes Inspector on the right. Modifying layouts, like adding a new button, also happens in the Storyboard. You drag the new element onto the view, and then use the Auto Layout tools to create constraints that define its position and size relative to other elements.
Monetization and Expansion: From Template to Business
Out of the box, the app has no monetization. It’s a blank canvas. The most common strategies would be:
- Freemium Model (In-App Purchase): Offer the app for free with limitations, such as a maximum of 3 subjects or 10 notes. An In-App Purchase (IAP) could unlock "Pro" features like unlimited items, iCloud sync, or the ability to export notes. Implementing this would require integrating the StoreKit framework.
- Ad-Supported Model: Integrate the Google Mobile Ads SDK (AdMob) to display banner ads or interstitial ads. This is often easier to implement than IAP but can degrade the user experience if not done tastefully.
- Paid Upfront: Simply list the app for a one-time price on the App Store. This is the simplest model but can be a tough sell in a crowded market.
Beyond monetization, the template is ripe for feature expansion. Obvious next steps would be adding iCloud sync to keep notes consistent across a user's devices, implementing a search function, allowing users to attach images or audio recordings to notes, or adding a reminder/notification system for study sessions.
The Verdict: A Critical Assessment
So, is the Student Study Notepad template a worthwhile investment? It depends entirely on who you are.
The Good
- Significant Time Saver: The template genuinely saves a developer from the grunt work of setting up a new project, structuring a Core Data model, and building the basic navigation and CRUD UI. This is its primary value.
- Clean, Standard Architecture: The use of native components (UIKit, Core Data) and a standard MVC pattern means there's no steep learning curve. Any competent iOS developer can pick this up and start working immediately.
- Dependency-Free: The lack of third-party pods or packages simplifies the build process and eliminates a common source of project rot and maintenance headaches.
- Functionally Sound: The core features work as expected. It's a stable foundation to build upon.
The Bad
- Dated UI Technology: Relying entirely on Storyboards feels dated in a world moving towards SwiftUI. While functional, it's less flexible and less performant than a programmatic or SwiftUI approach. Major UI overhauls will be more work.
- Lack of Modern Best Practices: The absence of any testing framework, dependency injection patterns, or a more advanced architecture like MVVM means a developer will need to add this rigor themselves if they want to build a truly robust, scalable application.
- Minimalistic Feature Set: It's a notepad. Features that users might now consider standard, like search, cloud sync, or rich text, are all absent and must be built from scratch.
Who Is This For?
This template is ideal for a few specific profiles:
- The Solo Entrepreneur/Indie Dev: Someone with coding skills who wants to launch an MVP quickly to test a market idea without spending months on boilerplate code.
- The Junior Developer: This project is a fantastic learning tool. It’s a complete, working app built with standard practices. A junior dev can learn a huge amount by dissecting how its Core Data stack is implemented and how the view controllers interact.
- A Small Agency: An agency could use this as a base for a client project, heavily reskinning it and adding custom features to deliver a product on a tight budget and timeline.
Ultimately, the Student Study Notepad template is a tool—an accelerator. It does not absolve you of the need for real development work. You will still need to write code to differentiate your product, implement monetization, and add the features that will make users choose your app over others. But it provides a solid, if basic, chassis to build upon. For the right developer, the head start it offers is easily worth the cost, trading a small amount of money for a massive amount of time. The value is clearly there, but it demands a developer who is ready to take the foundation and build a proper house on top of it.
- View Controllers: The brains of each screen (e.g.,