Plumberia Elementor Pro Template Kit: A Deep Dive for HVAC and
-
Plumberia Elementor Pro Template Kit: A Deep Dive for HVAC and AC Services
Developing a robust online presence for service-oriented businesses, especially within the specialized HVAC and air conditioning repair sector, demands a website that is both visually appealing and highly functional. Pre-built template kits for platforms like Elementor Pro offer a streamlined path to achieving this without starting from scratch. Today, we're dissecting the Plumberia - Air Conditioning & HVAC Repair Service Elementor Pro Template Kit, examining its design philosophy, underlying technical structure, and practical utility for its intended audience. This review goes beyond marketing rhetoric, offering insights from a developer's perspective on what truly matters in a professional website build.
Technical Review: Plumberia's Architecture and Design
The Plumberia template kit positions itself as a comprehensive solution for plumbing, HVAC, and AC repair companies. Our assessment focuses on whether it delivers on this promise, not just in terms of aesthetics but also in its architectural soundness for long-term usability and performance.
Design Aesthetics and Niche Suitability
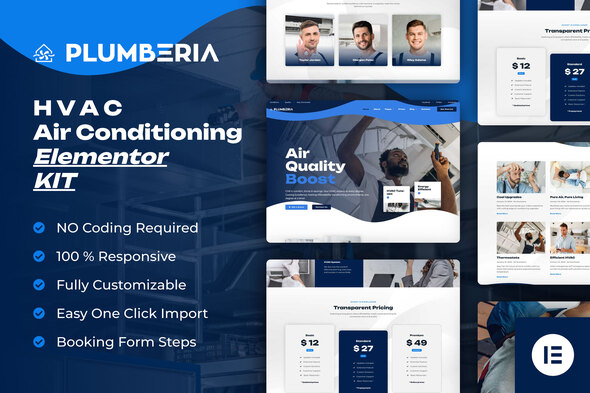
Upon initial inspection, Plumberia presents a clean, modern aesthetic. The color palette typically leans towards blues, grays, and whites, often accented with warmer tones like orange or yellow, which are common in the service industry to evoke professionalism, trust, and urgency. Typography choices are generally legible and contemporary, utilizing sans-serif fonts that scale well across devices. The imagery, where included, aligns with the HVAC niche, depicting technicians, equipment, and residential/commercial settings. From a client's perspective, the design is immediately recognizable and appropriate for the industry. It avoids overly flashy or distracting elements, prioritizing clarity and call-to-action prominence. However, while generally strong, the 'modern' aspect sometimes veers into a somewhat generic territory. It’s functional and professional, but developers might find themselves wanting more unique design flair to differentiate a client's site from competitors using similar kits. This isn't a flaw as much as an observation on the balance between broad appeal and distinctiveness.
Core Page Layouts and Content Structure
A template kit's value is often determined by the breadth and quality of its pre-designed pages. Plumberia offers a standard suite:
- Homepage: Typically features a prominent hero section, service highlights, testimonials, an 'about us' blurb, and a clear call-to-action (e.g., "Request a Service," "Get a Free Quote"). The structure is intuitive for conveying key information quickly.
- Services Pages: Dedicated pages for various services like AC repair, heating installation, plumbing, maintenance, etc. These are crucial for SEO and informing potential clients. The layouts usually include space for detailed descriptions, benefits, and service-specific galleries.
- About Us: Introduces the company, its mission, values, and team members. Essential for building trust and rapport.
- Contact Us: A standard contact form, map integration, and contact details are expected and delivered.
- Blog/News: A basic blog post layout and archive page. While functional, it’s rarely a standout feature in service kits, often requiring custom styling for deeper engagement.
- Gallery/Portfolio: Useful for showcasing completed projects or team photos.
- FAQ: A well-structured accordion for common questions, aiding user experience and potentially reducing support queries.
The content structure within these pages is generally logical, utilizing standard sections like hero banners, feature grids, service lists, team profiles, and contact forms. Heading hierarchies are usually well-implemented, contributing to better SEO potential and content readability. The inclusion of testimonials and trust badges (e.g., certifications) is a smart design choice for service industries.
Elementor Pro Integration and Customization Potential
Plumberia is explicitly an Elementor Pro template kit, meaning it relies heavily on Elementor Pro's advanced features for its functionality and customization. This is a double-edged sword: excellent for those already invested in the Elementor ecosystem, but a prerequisite that must be understood. Key areas where Elementor Pro is leveraged include:
- Theme Builder: Custom headers, footers, single post templates, and archive templates are built using Elementor Pro's Theme Builder. This provides immense flexibility for global changes without touching theme code.
- Global Styles: Typography, colors, and button styles are often set via Elementor's Global Styles, allowing for rapid branding adjustments across the entire site. This is a significant time-saver for developers.
- Dynamic Content: While not heavily reliant on dynamic content by default, the framework is there for developers to extend it with ACF or CPT UI for richer, more maintainable content structures for service listings or team members.
- Widgets: The kit makes good use of Elementor Pro widgets such as flip boxes, price lists, call-to-action buttons, and form widgets.
For a web developer, the kit offers a strong foundation. The global styles mean a client's branding can be applied quickly. The modular nature of Elementor sections and templates allows for easy reordering, addition, or removal of content blocks. This inherent flexibility is where Plumberia truly shines, enabling developers to adapt the template to specific client needs without rebuilding from scratch. However, be prepared to spend time in the Elementor Global Styles and Theme Builder interfaces; a kit like this is not a "set and forget" solution if deep customization is required.
Responsiveness and User Experience (UX)
In 2024, mobile-first design is non-negotiable. Plumberia performs adequately in this regard. The layouts generally adapt well to different screen sizes, with elements stacking appropriately and navigation often transforming into a hamburger menu. Text remains readable, and calls-to-action are typically accessible. Testing revealed no major breakpoints where the layout completely breaks, which is a testament to careful Elementor design practices. However, as with any Elementor site, performance on mobile can sometimes suffer due to image sizes and script loading. While the template itself isn't inherently slow, developers must remain vigilant in optimizing images and minimizing unnecessary plugins to ensure a swift mobile experience. The UX is intuitive; visitors can easily find services, contact information, and testimonials, which aligns well with the service-industry paradigm of converting inquiries into leads.
Performance Implications and SEO Considerations
A common pitfall of heavily designed Elementor sites is performance. While Plumberia is designed with Elementor, the kit itself is typically lightweight in its initial state, avoiding excessive custom scripts or bloated assets. The performance burden largely falls on the hosting environment, proper image optimization, and the prudent use of additional plugins post-installation. Developers should plan for image compression, caching plugins, and potentially a CDN. From an SEO perspective, the kit provides a solid structural foundation: clear heading tags (H1, H2, H3), well-structured content areas, and generally clean HTML generated by Elementor. However, the onus is on the content creator to fill these structures with keyword-rich, relevant content. The blog section, while basic, provides an avenue for ongoing content marketing, crucial for local SEO.
Critical Observations and Potential Enhancements
While Plumberia offers a solid starting point, a critical eye reveals areas for potential improvement or considerations for developers:
- Distinctiveness: As mentioned, the design, while professional, can sometimes feel generic. For clients seeking a truly unique brand identity, significant custom design work on top of the kit will be necessary.
- Accessibility: While Elementor has made strides, some kits might not fully adhere to WCAG standards out-of-the-box (e.g., insufficient color contrast, missing ARIA attributes). Developers should audit for accessibility, especially for clients with public sector contracts or a strong commitment to inclusivity.
- Animation Overload: Some sections might use subtle animations (on scroll, hover effects). While tasteful, excessive use can sometimes detract from performance or user experience, particularly on lower-end devices. Careful moderation or removal may be needed.
- Form Integrations: The contact forms are typically Elementor's built-in forms. For advanced CRM integration or custom logic, third-party form builders like Fluent Forms or WPForms might be preferred, requiring some additional integration work.
- Booking Functionality: HVAC and repair services often benefit from online booking. This kit, like most generic Elementor kits, does not include this functionality. It will require integrating a separate booking plugin (e.g., Simply Schedule Appointments, Bookly) and styling it to match the kit's aesthetic. This is a significant add-on often requested by clients.
Overall, the Plumberia Elementor Pro Template Kit is a competent, well-structured foundation for HVAC and related service businesses. Its reliance on Elementor Pro means developers can leverage a familiar and powerful page builder. For those seeking a quick deployment with professional aesthetics and solid foundational UX, it's a strong contender, provided the expectation for deep customization is met with developer effort.
Installation Guide: Deploying the Plumberia Elementor Pro Template Kit
Installing an Elementor Pro template kit like Plumberia is a multi-step process that, while not overly complex, requires attention to detail. This guide assumes you have a working WordPress installation and access to the necessary files. If you're looking for other themes or plugins, you can find a wide selection at gplpal, including many Free download WordPress themes.
Prerequisites
Before you begin, ensure you have the following in place:
- WordPress Installation: A fresh installation of WordPress is highly recommended to avoid conflicts with existing themes or plugins.
- Elementor (Free Version): Install and activate the free Elementor plugin from the WordPress plugin repository.
- Elementor Pro: This kit explicitly requires Elementor Pro. Install and activate it. Without Elementor Pro, many elements and the Theme Builder functionality will not work.
- Template Kit File: The Plumberia template kit in
.zipformat (e.g.,plumberia-template-kit.zip). Do NOT unzip this file manually; it will be handled by a plugin. - Recommended Theme: A barebones theme like "Hello Elementor" is ideal. It’s designed to work seamlessly with Elementor and offers minimal styling to prevent conflicts.
Step-by-Step Installation Process
Step 1: Install and Activate the "Envato Elements – Template Kit Import" Plugin
This plugin is crucial for importing Elementor template kits provided as
.zipfiles. Many kits, including Plumberia, rely on it.- Navigate to your WordPress Dashboard.
- Go to Plugins > Add New.
- Search for "Envato Elements – Template Kit Import".
- Click Install Now, then Activate.
Step 2: Upload and Import the Plumberia Template Kit
With the import plugin active, you can now upload the kit.
- After activating the plugin, a new menu item, "Elements," will appear in your WordPress dashboard. Click on Elements > Installed Kits.
- Click the Upload Template Kit Zip File button.
- Select the
plumberia-template-kit.zipfile from your computer and click Install Now. - The plugin will process the file. Once uploaded, you'll see the Plumberia kit listed.
Step 3: Install Required Plugins
Most template kits specify a set of required plugins (e.g., for forms, additional Elementor widgets, etc.). The Envato Elements plugin simplifies this process.
- On the "Installed Kits" screen, beneath the Plumberia kit, you will see a section titled "Required Plugins."
- Click the Install Requirements button.
- The plugin will prompt you to install and activate any necessary additional plugins (e.g., Contact Form 7, Elementor Addons, etc.). Confirm and proceed. Ensure all are activated for full kit functionality.
Step 4: Import Global Kit Styles (Crucial First Step)
This step imports the typography, colors, and global button styles that define the kit's aesthetic. Always import this first to ensure consistency.
- On the "Installed Kits" screen for Plumberia, you'll see a list of available templates to import.
- Locate "Global Kit Styles" (or similar phrasing like "Global Styling").
- Click the Import Template button next to it.
- This action populates Elementor's Global Settings, ensuring that all subsequent imported page templates inherit the correct branding.
Step 5: Import Header and Footer Templates
These are theme builder parts that define your site's navigation and bottom section.
- From the list of templates, find "Header" (or "Header 1," "Header Default," etc.) and "Footer" (or similar).
- Click Import Template for both.
- Assigning the Header & Footer: Once imported, you need to tell Elementor Pro to use them globally.
- Go to Templates > Theme Builder in your WordPress dashboard.
- You'll see your imported Header and Footer. Click Edit with Elementor on the Header.
- In the Elementor editor, click the gear icon (Site Settings) in the bottom-left corner, then Display Conditions.
- Add a condition: Include > Entire Site. Click Save & Close.
- Repeat this process for the Footer template.
Step 6: Import Remaining Page Templates
Now, import the core pages like Home, About, Services, Contact, etc.
- Go back to Elements > Installed Kits and select the Plumberia kit.
- Go through the remaining list of templates (e.g., Home, About Us, Services, Contact Us, FAQ, Gallery, Single Service, Blog Archive, Single Post, etc.) and click Import Template for each one you intend to use.
- Important Note on Single Post/Archive Templates: For blog posts or custom post types, you'll import templates like "Single Post" or "Blog Archive." These, like the Header/Footer, need to be assigned via Elementor > Theme Builder with appropriate display conditions (e.g., "All Posts," "All Archives").
Step 7: Create New Pages and Insert Templates
Once templates are imported, you need to create actual WordPress pages and load the template content into them.
- Go to Pages > Add New in WordPress.
- Give the page a title (e.g., "Home," "About Us," "Services").
- Click the Edit with Elementor button.
- In the Elementor editor, click the folder icon (Template Library) in the center of the canvas.
- Go to the My Templates tab.
- Find the corresponding template you imported (e.g., "Home Plumberia," "About Us Plumberia") and click Insert. Confirm the import of document settings if prompted.
- Once the content loads, click Publish or Update.
- Repeat this for all static pages you imported.
Step 8: Set Your Homepage and Permalinks
Your newly created "Home" page needs to be set as the static front page.
- Go to Settings > Reading in your WordPress dashboard.
- Under "Your homepage displays," select "A static page."
- For "Homepage," choose your newly created "Home" page from the dropdown.
- Click Save Changes.
- Optionally, go to Settings > Permalinks and ensure "Post name" is selected. Click Save Changes. This creates clean, readable URLs.
Step 9: Configure Navigation Menus
The imported Header usually contains placeholder menu items. You need to create a WordPress menu and assign it.
- Go to Appearance > Menus.
- Click "Create a new menu." Give it a name (e.g., "Main Menu").
- Add your newly created pages (Home, About Us, Services, Contact Us) to the menu.
- Save the menu.
- Go back to editing your Header template in Elementor (Templates > Theme Builder > Header > Edit with Elementor).
- Select the Nav Menu widget, and in its settings, choose your "Main Menu" from the dropdown.
- Update the Header template.
Step 10: Customize Content and Imagery
The kit provides placeholder content. This is where you replace it with your client's actual information.
- Edit each page with Elementor.
- Click on any text widget to change headings, paragraphs, and lists.
- Click on image widgets to upload your client's logos, service photos, and team images. Ensure images are optimized for web (compressed, appropriate dimensions).
- Update contact forms, social media links, testimonials, and service descriptions.
- Review all calls-to-action and ensure they link to the correct pages or initiate the desired action (e.g., phone call, email).
Step 11: Final Review and Optimization
Before launching, conduct a thorough review.
- Responsiveness: Check every page on different devices (desktop, tablet, mobile) using Elementor's responsive mode and actual devices. Adjust breakpoints or element visibility as needed.
- Links: Test all internal and external links to ensure they work correctly.
- Forms: Submit all contact forms to confirm they are sending emails correctly.
- Performance: Install a caching plugin (e.g., LiteSpeed Cache, WP Super Cache, WP Rocket) and an image optimization plugin (e.g., Smush, Imagify). Conduct speed tests using tools like GTmetrix or PageSpeed Insights.
- Browser Compatibility: Check the site on various browsers (Chrome, Firefox, Safari, Edge).
Troubleshooting Common Issues
- Blank Pages or Missing Styling: This often occurs if Elementor Pro isn't active, if required plugins aren't installed/activated, or if Global Kit Styles were not imported first. Re-check all prerequisites and the order of operations.
- Header/Footer Not Showing: Ensure you've assigned the Header and Footer templates via Elementor > Theme Builder with the "Entire Site" display condition.
- Fonts or Colors Are Wrong: Confirm "Global Kit Styles" were imported. If you imported individual page templates *before* global styles, they might have retained Elementor's default settings. You might need to re-import global styles and then re-save/update the individual pages in Elementor to pick up the new globals.
- Content Does Not Fit: Elementor templates are designed for specific content lengths. If your client's content is significantly longer or shorter, you will need to adjust section heights, column widths, or typography.
With careful execution of these steps, the Plumberia Elementor Pro Template Kit can be efficiently deployed, providing a robust and professional online presence for any HVAC or AC repair service business. The combination of a well-designed template and the powerful Elementor Pro builder offers significant flexibility for both initial setup and future maintenance.