Categories
Tags
-
#Image & Video FullScreen Background WordPress Plugin: A Developer's Deep Dive & Technical Review Creating an immersive first impression on a website often comes down to visuals. While clean
#minimalist designs have their place
#sometimes you need to hit the user with a full-blast
#edge-to-edge visual statement. This is where full-screen backgrounds come into play. They can set a mood
#showcase a product
#or create a cinematic experience that static layouts simply can't match. The challenge
#however
#has always been implementation. Wrestling with CSS
#ensuring responsiveness
#and fighting theme conflicts can turn a simple design idea into a development nightmare. This is the problem the Image&Video FullScreen Background WordPress Plugin aims to solve. In this technical review and guide
Archives
Gangsta Elementor Kit Review: A Developer's Deep-Dive on This "
-
Gangsta Elementor Kit Review: A Developer's Deep-Dive on This "Creative Agency" Template
Your agency's website is its digital handshake. It's the first proof point for a potential client that you understand design, user experience, and technical execution. Building that presence from scratch is a monumental task, which is why the market for pre-built solutions is booming. Enter the Elementor Template Kit, a promise of a professionally designed, multi-page website that you can deploy and customize in hours, not weeks. Today, we're putting one such product under the microscope: the Gangsta - Creative Agency & Portfolio Elementor Template Kit. The name is bold, the demos look slick, but as developers, we know that looks can be deceiving. This isn't just a surface-level overview; we're going to install it, dissect its structure, test its limits, and deliver a verdict on whether this kit has the substance to back up its style.
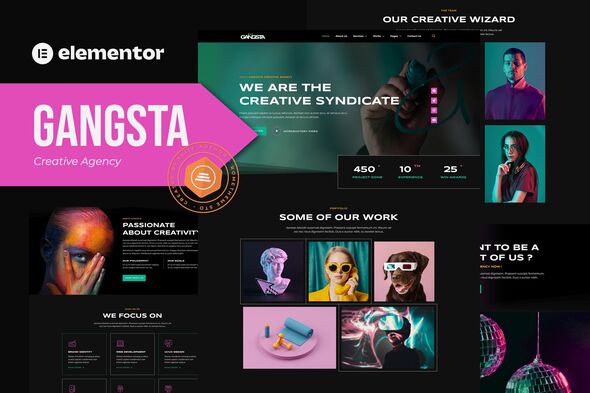
What You're Actually Getting: Unpacking the "Gangsta" Kit
After acquiring the kit, you're left with a single ZIP file. There's no bloated theme, no convoluted plugin dependencies beyond the core requirements. Inside this compressed archive lies the blueprint for the website, broken down into a series of JSON files and a manifest. This is the standard, clean structure for an Elementor Template Kit.
The kit promises over 15 templates. Let's break down the critical assets included:
- Core Pages: Home, About Us, Our Services, FAQ, and Contact Us. These are the foundational pages every agency site needs.
- Portfolio Functionality: Templates for a main Portfolio grid page and a single Portfolio detail page. This is crucial for any creative business.
- Blog Templates: Designs for the main Blog archive and a single Post layout.
- Utility Pages: A 404 Error page and a Coming Soon page. These are thoughtful inclusions that show a degree of completeness.
- Theme Builder Parts: Header, Footer, and a Global Page Template. These are the reusable components that provide site-wide consistency.
The first and most important technical point to address is the dependency. This kit requires Elementor Pro. This is not a suggestion; it's a hard requirement. Key components like the Header, Footer, Portfolio Grid, and Contact Form are built using Pro-exclusive widgets and the Theme Builder functionality. If you're attempting to use this with the free version of Elementor, you will hit a wall immediately. This is a critical purchasing consideration. The "no-code" promise is true, but it's predicated on you having the premium version of the page builder.
Aesthetically, the first impression is one of clean, modern brutalism-lite. It features bold, condensed typography, a mostly monochromatic color scheme with a single accent color, and a strong grid-based layout. The "Gangsta" name seems to be more of a marketing angle for "edgy" and "bold" rather than anything literal. It fits the bill for a modern design studio, a digital marketing agency, or a freelance collective aiming for a confident, high-impact visual identity.
The Installation Gauntlet: A Step-by-Step Deployment Guide
A template kit's value is directly tied to how easily it can be deployed. We'll walk through the process on a clean WordPress installation to identify any potential hurdles.
Step 1: The Prerequisite Arsenal
Before you even think about uploading the kit, ensure your environment is prepped. A failure to do so is the number one cause of import errors.
- A Clean WordPress Install: I highly recommend starting with a fresh WordPress site. Installing this on top of an existing, content-heavy site with another theme can lead to plugin conflicts and styling overrides.
- The Hello Elementor Theme: While the kit should technically work with most lightweight themes, it's designed and tested with Elementor's own "Hello" theme. It's a bare-bones canvas that ensures the kit's styles take full precedence. Install and activate it.
- Elementor (Free): Install the latest version from the WordPress repository.
- Elementor Pro: This is the non-negotiable part. You must have an active Elementor Pro subscription, with the plugin installed and activated.
- Template Kit - Import Plugin: The native Elementor import tool is designed for single pages, not comprehensive kits. You'll need a dedicated importer plugin. The one simply called "Template Kit - Import" by Envato is the standard and works flawlessly.
Step 2: The Import Process
With your environment ready, the actual import is straightforward if you follow the correct order.
- Navigate to the Importer: In your WordPress dashboard, go to Tools > Template Kit.
- Upload the ZIP: Click the "Upload Template Kit ZIP File" button and select the `gangsta.zip` file you downloaded. The plugin will now process the manifest and display all the included templates.
- Install Requirements: The importer is smart enough to detect if any additional plugins are suggested by the kit. The Gangsta kit is clean and doesn't require extra plugins, but if it did, this is where you would install them.
- Import the Global Kit Styles (Crucial First Step): This is the most important part of the process. Before importing individual pages, you MUST import the "Global Kit Styles". This file sets up the site-wide settings in Elementor, including the color palette, typography styles (H1, H2, body text, etc.), theme style settings, and layout preferences. Importing this first ensures that all other templates will inherit the correct design language.
- Import Individual Templates: Now, you can go down the list and import each template one by one. I recommend starting with the Header and Footer, then the core pages like Home, About, and Services. The green checkmark next to each will confirm a successful import.
Step 3: Developer's Log - Common Pitfalls & Troubleshooting
This is where a smooth process can turn into a frustrating one. Here are some real-world issues you might encounter and how to solve them:
- The "Unfiltered File Uploads" Error: During the import, you might see a warning that requires you to enable unfiltered file uploads. Elementor Kits contain SVG files (for icons) and JSON files (the templates themselves). Some WordPress configurations, for security reasons, block these by default. To resolve this, go to Elementor > Settings > Advanced. In the "Enable Unfiltered File Uploads" dropdown, select "Enable". Save your changes and retry the import. Remember to consider disabling this after the import for security hardening if you're on a shared host.
- Silent Import Failures: You click "Import," the wheel spins, and then... nothing happens. The template doesn't appear in your saved templates list. This is almost always a server resource issue. Check your web host's `php.ini` settings for `upload_max_filesize`, `post_max_size`, and `memory_limit`. For importing complex kits, I recommend setting these to at least 64M.
- Creating the Pages: Importing the templates doesn't automatically create the pages on your site. It only adds them to your Elementor template library. You still need to go to Pages > Add New, create a "Home" page, for example, then click "Edit with Elementor" and insert the "Home" template you just imported.
- Hooking Up the Theme Builder Parts: The Header and Footer won't appear automatically. You need to go to Templates > Theme Builder. Find your imported Header, click "Edit conditions," and set it to display across the "Entire Site." Repeat the process for the Footer. This is a fundamental Elementor Pro workflow.
Under the Hood: A Technical Teardown of the Gangsta Kit
With the kit installed, it's time to put on the developer's hat and analyze its construction. A kit can look good on the surface but be a nightmare to maintain if built poorly.
Design Language and Style Implementation
The good news is that the Gangsta kit is built correctly. It makes excellent use of Elementor's Global Styles. The primary, secondary, and accent colors are all defined in the Site Settings. This means that rebranding is incredibly simple. Change the accent color in one place, and it will update across every button, link, and colored element on the site. The same goes for typography. The H1-H6 tags, body text, and link styles are all globally defined. This is the mark of a professionally constructed kit, saving you from the tedious task of updating every single widget's style tab individually.
Structural Integrity and Widget Usage
Peeking into the Elementor Navigator reveals a generally clean and logical structure. Sections and columns are used appropriately, and the nesting depth is reasonable. A poorly built template might have sections inside of sections inside of sections, leading to a bloated DOM and slower page rendering. The Gangsta kit avoids this "div-ception" for the most part.
However, there is a moderate use of absolute positioning for some of the overlapping design elements, like the decorative background text or images that bleed off the grid. While this achieves the desired aesthetic, it's a double-edged sword. It can make responsive adjustments more complex for novice users. If you change the size of an image or the length of a heading, you may need to manually tweak the X/Y positioning values for tablet and mobile breakpoints to prevent elements from crashing into each other.
The Responsive Reality Check
The kit claims to be fully responsive, and for the most part, it is. The standard Desktop, Tablet, and Mobile views in Elementor look good. Layouts stack correctly, font sizes adjust, and navigation collapses into a functional mobile menu.
My critique comes from the in-between states. When resizing a browser window slowly on a desktop, I noticed a few awkward snapping points. For example, a three-column layout might look great at 1440px and stack nicely at the 768px tablet breakpoint, but at around 900px, the columns can become too compressed before they stack. This is a common issue with Elementor's breakpoint system. A skilled developer would address this with some custom CSS media queries for those intermediate screen sizes, but out of the box, it's a minor imperfection. The mobile view is solid, with clear text and easily tappable buttons, which is arguably the most critical breakpoint to get right.
Performance and Bloat Analysis
No Elementor site is going to be as performant as a custom-coded static site. The page builder itself adds a certain amount of overhead. The question is, does this kit add unnecessary bloat on top of that?
The kit is reasonably lightweight. It doesn't load a ton of custom fonts; it relies on a clean, standard set. The animations are subtle and used sparingly, primarily for on-scroll fade-in effects, which have a minimal performance impact. The primary performance bottleneck, as with any site, will be the images you use. The demo images are well-optimized, but if a user replaces them with massive, uncompressed 4MB JPEGs, the page load speed will plummet. This isn't the kit's fault, but it's a crucial part of real-world implementation. A user of this kit must still practice good performance hygiene: compress all images, implement a caching plugin (like WP Rocket or LiteSpeed Cache), and consider using a CDN.
Malleability Test: Bending the Kit to Your Brand
A template kit is a starting point, not a final product. How easy is it to customize and make it your own?
Thanks to the proper use of Global Styles, rebranding is a breeze. Changing the logo in the Header template is simple, and the layout handles reasonably different logo dimensions without breaking. Swapping out the demo text and images is standard Elementor fare.
The biggest test is the Portfolio. A look at its structure reveals that it uses the Elementor Pro "Portfolio" widget. This is an excellent choice. It means the portfolio items are not static blocks on a page; they are powered by the actual "Portfolio" custom post type in WordPress. This is a scalable, professional way to build a portfolio. You can easily add new projects through the WordPress admin, assign them featured images and categories, and they will automatically populate the grid on the Portfolio page. This is a major pro, as some cheaper kits fake a portfolio with static image boxes, which is a maintenance nightmare for any agency that's actively adding new work.
The contact form uses the Elementor Pro Form widget, which is robust and easy to configure. You can add fields, style the form, and set up email notifications without needing another plugin like Contact Form 7. This keeps the plugin footprint smaller and the editing experience unified within Elementor.
The Verdict: Who Is This "Gangsta" Kit For?
After a thorough installation and technical review, a clear picture emerges. The "Gangsta - Creative Agency & Portfolio Elementor Template Kit" is a well-constructed, professional tool that delivers on its core promise. It's not revolutionary, but it executes the fundamentals exceptionally well.
Pros:
- Rapid Deployment: You can genuinely go from a blank WordPress install to a fully-featured, professional-looking agency site in an afternoon.
- Professional Structure: Proper use of Global Styles and the Theme Builder makes customization and maintenance efficient.
- Scalable Portfolio: The use of a custom post type for the portfolio is the correct, scalable approach.
- Cohesive Design: The aesthetic is modern, bold, and consistent across all 15+ templates.
Cons:
- Elementor Pro Requirement: This is a significant cost barrier for those on a tight budget.
- Minor Responsive Imperfections: While good overall, it could benefit from fine-tuning for intermediate screen sizes.
- Generic "Edginess": The design, while clean, could be seen as somewhat generic within the "modern agency" trend. It might not be unique enough for agencies wanting to stand out purely on design.
So, who is the ideal user? This kit is a perfect fit for freelance web developers building sites for small to medium-sized creative agencies on a timeline and budget. It provides a rock-solid foundation that can be quickly rebranded and deployed. It's also excellent for a new agency or startup that needs a polished web presence immediately without the cost of a fully custom build. They can get online fast and focus on their client work.
Who should avoid it? If you're an agency whose entire brand is built on cutting-edge, one-of-a-kind web design, a template kit—any template kit—is probably not for you. You need a bespoke solution. Similarly, performance purists who count every kilobyte and DOM element will likely prefer to build with a more lightweight framework.
Ultimately, "Gangsta" is a capable and reliable tool in the right developer's hands. It trades groundbreaking uniqueness for speed and professional execution, which is a worthwhile trade-off for a huge segment of the market. Sourcing the kit from a trusted marketplace like gplpal ensures you're working with the authentic files. And if this particular brutalist style isn't the perfect match for your project, browsing a wider collection of Free download WordPress themes and templates might just uncover the exact foundation you need for your next client build.